TagHelpers in Asp.Net Core
With the release of .Net Core, TagHelpers were introduced. TagHelpers have actually been around for quite some time but called HTMLHelpers. These were more complex to use, especially from an HTML standpoint. There are many articles you can read on TagHelpers and their transformation from HTMLHelpers if you'd like more information. In this article, let's discuss Custom TagHelpers and different ways you can use them.
Your first question is probably, "Why do I need Custom TagHelpers?" The simple answer is that they reduce the amount of HTML code you need to write and create a more abstracted layer between your UI code and server-side code. We'll see more of this as we get further along, but first, let's take a look at the basic concepts.
There are several different ways to create a custom tag. Let's go through each of them. To keep it simple, let's create a new tag which will display Hello World
You can find source code for TagHelpers here
My First TagHelper
To create your first TagHelper, create a new class called "HelloworldTagHelper". (I have created a "TagHelpers" folder in my application where I create all my TagHelpers.) It's important to note that every custom TagHelper class implements TagHelper:
public class HelloworldTagHelper : TagHelper
And to build your new element output, you need to override one of two methods
void Process(TagHelperContext context, TagHelperOutput output){} async Task ProcessAsync(TagHelperContext context, TagHelperOutput output){} For our first TagHelper, we want to simply create our own tag and output "Hello World" in a span tag. To do this, adjust your new TagHelper class as follows.
public class HelloworldTagHelper : TagHelper { public override void Process(TagHelperContext context, TagHelperOutput output) { output.TagName = "span"; output.Content.SetContent("Hello World"); } } In the above, you are overriding the TagHelper Process method, setting the output to contain your new span tag with "Hello World" as your content.
Once you have your TagHelper created, you need to have your TagHelpers referenced. In the _ViewImports.cshtml file, you should have something similar to the following:
@using BlogTagHelpers @addTagHelper *, Microsoft.AspNetCore.Mvc.TagHelpers @addTagHelper "*, BlogTagHelpers"
What we are saying here is to include all the MVC TagHelpers and all the TagHelpers in the BlogTagHelpers assembly. You could have just as easily have written it this way:
@addTagHelper "BlogTagHelpers.TagHelpers.HelloworldTagHelper, BlogTagHelpers"
And finally, in an appropriate .cshtml file (most likely your Index.cshtml for this example), simply set your new tag:
<helloworld></helloworld>
Run the program and if you view source, you should see the following:

Tag Naming Conventions
You might have noticed in the previous example that our html element was just "helloworld" and the words TagHelper were not found. This is because, by convention, any class that inherits from TagHelper is understood to be a TagHelper and, therefore, the TagHelper words are removed from the end of the class name. With that said, you could also write your custom TagHelper this way:
public class Helloworld: TagHelper { public override void Process(TagHelperContext context, TagHelperOutput output) { output.TagName = "span"; output.Content.SetContent("Hello World"); } } HtmlTargetElement Attribute
Another way to specify the name of your new tag element is to use the HtmlTargetElement attribute of your class. Add the HtmlTargetElement attribute to your class this way:
[HtmlTargetElement("hello-world")] public class HelloworldTagHelper: TagHelper And change your HTML tag to work with the name you have given your custom TagHelper:
<helloworld></helloworld>
You are now possibly asking yourself, "What if I don't want a brand-new tag?" Well, you can just specify the element you want to manipulate if you don't want a new tag:
[HtmlTargetElement("span")] public class HelloWorldSpanTagHelper : TagHelper And if you are going to use the same TagHelper for different target elements, you can use multiple TargetElement attributes for different elements as well:
[HtmlTargetElement("hello-world")] [HtmlTargetElement("span")] public class HelloWorldSpanTagHelper : TagHelper Looking back at the span TargetElement, we might hesitate to use something like that as "span" is a common tag in HTML. We actually only need it when someone sets a span element with an attribute "product-name".
<span product-name="Widget"></span>
In this particular case, we can specify required attributes on our target element in order for the TagHelper to process. If we had the HTML <span to-name="Tyler"></span> , it would not process because the TagHelper is looking for both the span element and the product-name attribute:
[HtmlTargetElement("span", Attributes = "product-name")] Element Attributes and HtmlAttributeName
There are a couple of different ways of getting data passed into a TagHelper. The first is as an attribute and the second is as content. Here, we'll talk about passing data in as an attribute.
Let's look at this HTML: <span to-name="Tyler"></span> Notice that we have a custom attribute "to-name". If we want this specific element to render "Hello, Tyler", we need to be able to accept this attribute's value in our TagHelper. Look at the following code and notice that we have a new property called ToName. TagHelper properties translate lowercase and dashes between uppercase characters.
[HtmlTargetElement("span")] public class HelloWorldSpanTagHelper : TagHelper { public string ToName { get; set; } public override void Process(TagHelperContext context, TagHelperOutput output) { output.Content.SetContent($"Hello, {ToName}"); } } The property name "ToName" seems a little unnecessary as really we just want "Name". In order to use a property with any arbitrary name and still map to the appropriate element attribute, we need to use the HtmlAttibuteName attribute on our property:
[HtmlAttributeName("to-name")] public string Name { get; set; } Even though looking at this current implementation, we are setting our properties to string values, you can set them to pretty much any type you like.
<element price="12.99"></element> public decimal Price { get; set; } <element item="@item"></element> public ProductItem Item { get; set; } Setting Content
Let's look at an interesting scenario. Here I have my TagHelper, which is setting the content to Hello World:
[HtmlTargetElement("span")] public class HelloWorldSpanTagHelper : TagHelper { public override void Process(TagHelperContext context, TagHelperOutput output) { output.Content.SetContent("Hello World"); } } If you run the following code in your application, you might be surprised to see "Hello World" on two separate lines instead of "Content" listed on your second line. If you look closely at our Process method, we are setting the content, but not using any of the existing content.
<span></span> <br/> <span>Content</span>
If you want to still utilize the existing content, you will need to override the ProcessAsync method. Inside this method, you will need to call await output.GetChildContentAsync(). Here, we grab the name and set the content to what we want it to be using the existing name:
[HtmlTargetElement("span")] public class HelloWorldSpanTagHelper : TagHelper { public override async Task ProcessAsync(TagHelperContext context, TagHelperOutput output) { var content = await output.GetChildContentAsync(); var name = content.GetContent(); output.Content.SetContent($"Hello, {name}"); } } <span>Tyler</span>
Something else to keep in mind is that you don't always need to set all the content. You can simply append it.
[HtmlTargetElement("span")] public class HelloWorldSpanTagHelper : TagHelper { public override async Task ProcessAsync(TagHelperContext context, TagHelperOutput output) { var content = await output.GetChildContentAsync(); content.Append(", Hello World"); output.Content = content; } } Another quick item to point out is that SetContent and Append will write out as text. If you have HTML that you want to set or append you need to use SetHtmlContent and AppendHtml.
Complex Examples
Many times when reading blogs, I see the simple stuff (that we covered above), but am left wanting more complex, concrete examples. I've put together a couple of examples here, but by no means are these complete. These are very dirty examples, but are included to give you an idea of how you can build on these basic concepts.
List of Products Example:

ProductItems.cshtml
@model IList<BlogTagHelpers.Core.Models.ProductItem> @{ ViewData["Title"] = "Product Items"; } <h2>Product Items</h2> <div class="row"> @foreach (var item in Model) { <div class="col-md-4"> <product-item item="@item"></product-item> </div> } </div> ProductItemTagHelper.cs
using BlogTagHelpers.Core.Models; using Microsoft.AspNetCore.Razor.TagHelpers; namespace BlogTagHelpers.TagHelpers { [HtmlTargetElement("product-item", Attributes = "item")] public class ProductItemTagHelper : TagHelper { public ProductItem Item { get; set; } public override void Process(TagHelperContext context, TagHelperOutput output) { output.TagName = "div"; output.Attributes.Add("class", "product-item"); output.Content.SetHtmlContent(ProductItemContent()); } private string ProductItemContent() { return $@"<div class="row"> <div class="col-md-12"> <img src = "images/{Item.ImageName}-300.webp" class="ull-left" /> </div> </div> <div class="row title"> <div class="col-md-8"> <label>{Item.Name}</label> </div> <div class="col-md-4"> <label>${Item.Price}</label> </div> </div> <div class="row"> <div class="col-md-12"> <span>{Item.Description}</span> </div> </div>"; } } } Checkout Page Example:
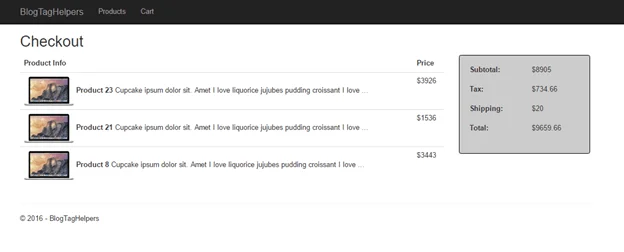
Cart.cshtml
@using BlogTagHelpers.Core.Models @model BlogTagHelpers.Core.Models.Cart @{ ViewData["Title"] = "Product Items"; } <h2>Checkout</h2> <div class="row"> <div class="col-md-9"> <table class="table"> <thead> <tr> <th>Product Info</th> <th>Price</th> </tr> </thead> <tbody> @foreach (var cartItem in Model.Items) { <tr> <td> <image image-name="@cartItem.ImageName"></image> <label>@cartItem.Name</label> <span limit-to="80">@cartItem.Description</span> </td> <td>$@cartItem.Price</td> </tr> } </tbody> </table> </div> <div class="col-md-3"> <cart-total cart-subtotal="@Model.Subtotal" cart-tax="@Model.Tax" cart-shipping="@Model.ShippingAmount"></cart-total> </div> </div> LimitTextTagHelper.cs
using System.Threading.Tasks; using Microsoft.AspNetCore.Razor.TagHelpers; namespace BlogTagHelpers.TagHelpers { [HtmlTargetElement("span", Attributes = LimitTo)] public class LimitTextTagHelper : TagHelper { private const string LimitTo = "limit-to"; [HtmlAttributeName(LimitTo)] public int MaxLength { get; set; } public override async Task ProcessAsync(TagHelperContext context, TagHelperOutput output) { var text = (await output.GetChildContentAsync()).GetContent(); if (string.IsNullOrEmpty(text) || text.Length <= MaxLength) return; output.Content.SetContent($"{text.Substring(0, MaxLength)}..."); } } } ImageTagHelper.cs
using Microsoft.AspNetCore.Razor.TagHelpers; namespace BlogTagHelpers.TagHelpers { [HtmlTargetElement("image", Attributes = ImageName)] public class ImageTagHelper : TagHelper { private const string ImageName = "image-name"; [HtmlAttributeName(ImageName)] public string Name { get; set; } public override void Process(TagHelperContext context, TagHelperOutput output) { output.TagName = "img"; output.TagMode = TagMode.SelfClosing; output.Attributes.Clear(); output.Attributes.Add("src", $"/images/{Name}-100.webp"); } } } CartTotalTagHelper.cs
using System; using Microsoft.AspNetCore.Razor.TagHelpers; namespace BlogTagHelpers.TagHelpers { [HtmlTargetElement("cart-total", Attributes = "cart-subtotal, cart-tax, cart-shipping")] public class CartTotalTagHelper : TagHelper { [HtmlAttributeName("cart-subtotal")] public decimal Subtotal { get; set; } [HtmlAttributeName("cart-tax")] public decimal Tax { get; set; } [HtmlAttributeName("cart-shipping")] public decimal Shipping { get; set; } public override void Process(TagHelperContext context, TagHelperOutput output) { var template = $@"<div class="form-group"> <label class="col-md-6">Subtotal:</label> <div class="col-md-6"> <span class="form-control-static">${Math.Round(Subtotal, 2)}</span> </div> </div> <div class="form-group"> <label class="col-md-6">Tax:</label> <div class="col-md-6"> <span class="form-control-static">${Math.Round(Tax, 2)}</span> </div> </div> <div class="form-group"> <label class="col-md-6">Shipping:</label> <div class="col-md-6"> <span class="form-control-static">${Math.Round(Shipping, 2)}</span> </div> </div> <div class="form-group"> <label class="col-md-6">Total:</label> <div class="col-md-6"> <span class="form-control-static">${Math.Round(Subtotal + Tax + Shipping, 2)}</span> </div> </div>"; output.TagName = "form"; output.Attributes.Clear(); output.Attributes.Add("class", "cart-totals form-horizontal"); output.Content.SetHtmlContent(template); } } }
Cazton is composed of technical professionals with expertise gained all over the world and in all fields of the tech industry and we put this expertise to work for you. We serve all industries, including banking, finance, legal services, life sciences & healthcare, technology, media, and the public sector. Check out some of our services:
- Artificial Intelligence
- Big Data
- Web Development
- Mobile Development
- Desktop Development
- API Development
- Database Development
- Cloud
- DevOps
- Enterprise Search
- Blockchain
- Enterprise Architecture
Cazton has expanded into a global company, servicing clients not only across the United States, but in Oslo, Norway; Stockholm, Sweden; London, England; Berlin, Germany; Frankfurt, Germany; Paris, France; Amsterdam, Netherlands; Brussels, Belgium; Rome, Italy; Sydney, Melbourne, Australia; Quebec City, Toronto Vancouver, Montreal, Ottawa, Calgary, Edmonton, Victoria, and Winnipeg as well. In the United States, we provide our consulting and training services across various cities like Austin, Dallas, Houston, New York, New Jersey, Irvine, Los Angeles, Denver, Boulder, Charlotte, Atlanta, Orlando, Miami, San Antonio, San Diego, San Francisco, San Jose, Stamford and others. Contact us today to learn more about what our experts can do for you.